Import your Dashlane data into Codebook
You can import your passwords and other data from Dashlane into Codebook for macOS or Codebook for Windows after editing the CSV files created during a Dashlane export. These instructions were written based on the Dashlane 6.2 exported CSV files.
How it works:
Dashlane CSV export creates a .zip file that contains upto 5 CSV files, one for each grouping of data in your vault.
- ids.csv - contains passport, drivers license, social security number, id card and tax information
- payments.csv - contains your credit cards and bank information
- securenotes.csv - contains your secure notes
- personalinfo.csv - contains your name, email, phone number, etc.
- credentials.csv - contains your passwords and other credentials for websites
These steps explain how modify these CSV files so they can be imported into Codebook.
Before You Begin
Caution: You are about to export your passwords into an unencrypted file! We recommend you temporarily disable any backup software you use to avoid creating a backup of the unencrypted file. Anybody with access to this file will be able to see your passwords and other secrets.
Step 1: Export your data from Dashlane
- Launch Dashlane on your computer and log in
- Click on File > Export CSV
- Save the .zip file to your computer and unzip. The folder that is created will contain up to 5 CSV files containing your data.
Step 2: Modify the CSV files
You will need to edit each of the CSV files that were created during the Dashlane export.
NOTE: The csv file must contain the columns "Category" and "Entry". They must start with a capital letter.
-
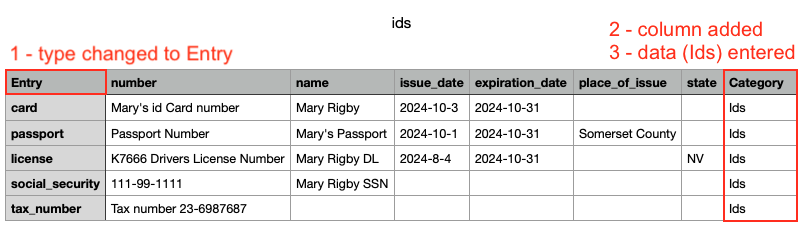
Edit ids.csv as follows:
- Change "type" in the header row to "Entry"
- Add a column with "Category" in the header row
- Insert "ids" in each row in the new column. This will become the category name. You can create your own
category names.
-
Edit payments.csv as follows:
- Change "type" in the header row to "Entry"
- Add a column with "Category" in the header row
- Insert "payments" in each row in the new column. This will become the category name. You can create your own
category names.

-
Edit securenotes.csv as follows:
- Change "title" in the header row to "Entry"
- Add a column with "Category" in the header row
- Insert "notes" in each row in the new column. This will become the category name. You can create your
own
category names.

-
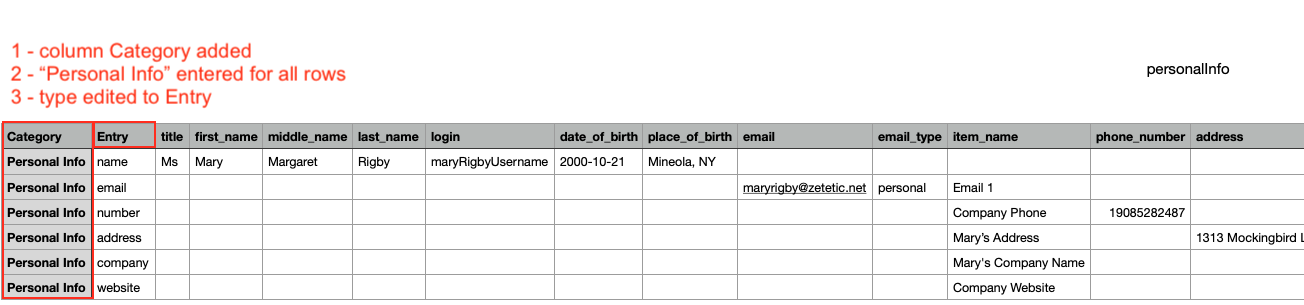
Edit personalinfo.csv as follows:
- Change "type" in the header row to "Entry"
- Add a column with "Category" in the header row
- Insert "Personal Info" in each row in the new column. This will become the category name. The data in
each row in this file will be stored in an entry in the Personal Info category.
-
Edit credentials.csv as follows:
- Change "title" in the header row to "Entry"
- Edit the column header from category to "Category"
- Insert "Credentials" in each row in the column Category

For more details about formatting a CSV file see format.
Step 3: Import your data into Codebook
- Launch Codebook on your compuer and log in
- Click on File > Import > Import CSV
- Repeat this step for each CSV file that you edited in Step 2:
- In the file chooser that appears, select one of the CSV files you modified in Step 2. You need to import each edited csv file individually.
- After the import process completes, verify that the data you imported is present in the Codebook
Step 4: Clean Up
- Delete the zip export file from Dashlane and all files you edited
- If you had disabled your backup software, resume it now
Next Steps
Now you're ready to get started using Codebook!
- Our Getting Started tutorials will show you around the app
- Check out Password AutoFill and Secret Agent for filling in your passwords
Need Help?
If you are having trouble importing your data or have other questions, please contact Codebook Support.